在公司部门内部做的一次关于前端和React的分享
前端历史
Web 1.0
HTML的静态网页
后端服务直接返回固定的HTML+CSS
1
2
3
4
5
6
7
8
9
10
11
12
| <html>
<head>
<title>我的第一个 HTML 页面</title>
</head>
<body>
<p>body 元素的内容会显示在浏览器中。</p>
<p>title 元素的内容会显示在浏览器的标题栏中。</p>
</body>
</html>
|
后端渲染的动态网页
后端收到浏览器请求
模板引擎渲染生成HTML+CSS+JS
浏览器接收并渲染
后端的MVC开发模式
前端工程师只需要编写页面模板,给后端留出变量的位置
核心工作是写CSS做成UI的设计稿,称为切图仔
PHP
1
2
3
4
5
6
7
8
9
10
| <!DOCTYPE html>
<html>
<body>
<?php
echo "Hello World!";
?>
</body>
</html>
|
Python jinja2
最开始的五彩石前后端架构
1
2
3
4
5
6
7
8
9
| {% extends "base.html" %}
{% block title %}Members{% endblock %}
{% block content %}
<ul>
{% for user in users %}
<li><a href="{{ user.url }}">{{ user.username }}</a></li>
{% endfor %}
</ul>
{% endblock %}
|
Web2.0
Ajax - 1999
可以在不刷新整个页面的情况下,获取新的数据,改变页面局部的信息。
jQuery - 2006
一套跨浏览器的JavaScript库,用于简化HTML与JavaScript之间的操作。
1
2
3
4
5
6
7
8
9
10
11
12
13
14
15
16
| <html>
<head>
<script type="text/javascript" src="jquery.js"></script>
<script type="text/javascript">
$(document).ready(function () {
$("p").click(function () {
$(this).hide();
});
});
</script>
</head>
<body>
<p>If you click on me, I will disappear.</p>
</body>
</html>
|
BackBone.js - 2010
前端MVC框架,也可以处理数据、保存数据、生成视图
React.js - 2013
Facebook 的软件工程师 Jordan Walke 创建的MVVM 组件化、声明式框架
Vue.js - 2014
在为AngularJS工作之后,尤雨溪开发出的渐进式框架 JavaScript框架
React
umi 脚手架
生成代码框架
1
2
3
4
5
6
7
8
9
10
11
12
13
14
15
| $ yarn create @umijs/umi-app
Copy: .editorconfig
Write: .gitignore
Copy: .prettierignore
Copy: .prettierrc
Write: .umirc.ts
Copy: mock/.gitkeep
Write: package.json
Copy: README.md
Copy: src/pages/index.less
Copy: src/pages/index.tsx
Copy: tsconfig.json
Copy: typings.d.ts
✨ Done in 2.07s.
|
安装依赖
1
2
3
4
5
6
| $ yarn
yarn install v1.21.1
[1/4] 🔍 Resolving packages...
success Already up-to-date.
✨ Done in 0.71s.
|
启动
1
2
3
4
5
6
7
8
9
10
11
12
13
| $ yarn start
yarn run v1.22.17
$ umi dev
Starting the development server...
✔ Webpack
Compiled successfully in 2.08s
DONE Compiled successfully in 2078ms
App running at:
- Local: http://localhost:8000 (copied to clipboard)
- Network: http://10.36.220.244:8000
|
目录结构
1
2
3
4
5
6
7
8
9
10
11
12
13
14
15
16
17
| .
├── .editorconfig
├── .gitignore
├── .prettierignore
├── .prettierrc
├── .umirc.ts
├── README.md
├── mock
│ └── .gitkeep
├── package.json
├── src
│ └── pages
│ ├── index.less
│ └── index.tsx
├── tsconfig.json
├── typings.d.ts
└── yarn.lock
|
JSX
JavaScript 的语法扩展
和普通的HTML标签对相比
可以在正常的js代码中嵌入
1
| const element = <h1>Hello</h1>;
|
也可以在jsx标签对中嵌入js代码
1
| <img src={user.avatarUrl}></img>;
|
组件化
1
2
3
4
5
6
7
8
9
10
| import styles from './index.less';
export default function IndexPage() {
return (
<div>
<h1 className={styles.title}>Page index</h1>
</div>
);
}
|
使用组件
1
2
3
4
5
6
7
8
9
10
11
12
13
14
15
16
17
18
| import styles from './index.less';
export default function IndexPage() {
return (
<div>
<Component/>
</div>
);
}
function Component() {
return (
<div>
<h1 className={styles.title}>Page index</h1>
</div>
);
}
|
组件参数
1
2
3
4
5
6
7
8
9
10
11
12
13
14
15
16
17
18
19
20
| import styles from './index.less';
export default function IndexPage() {
return (
<div>
<Component title={"title"} a="b"/>
</div>
);
}
function Component(props) {
return (
<div>
<h1 className={styles.title}>Page index</h1>
<div>{props.title}</div>
<p>{props.a}</p>
</div>
);
}
|
props是不能更改的
条件渲染
1
2
3
4
5
6
7
8
9
10
11
12
13
14
15
16
17
18
19
20
| import styles from './index.less';
export default function IndexPage() {
const x = false
return (
<div>
{x ? <Component title={"a"}/> : <Component title={"b"}/>}
</div>
);
}
function Component(props) {
return (
<div>
<h1 className={styles.title}>Page index</h1>
<div>{props.title}</div>
</div>
);
}
|
用于Modal消息框或者加载中Loading的提示
列表渲染
1
2
3
4
5
6
7
8
9
10
11
12
13
14
15
16
17
18
19
20
21
22
| import styles from './index.less';
export default function IndexPage() {
const x = ["a", "b", "c"]
return (
<div>
{x.map(title => {
return <Component title={title}/>
})}
</div>
);
}
function Component(props) {
return (
<div>
<h1 className={styles.title}>Page index</h1>
<div>{props.title}</div>
</div>
);
}
|
通过map 、for 、foreach等批量生成组件
函数式组件和类组件
函数式组件
1
2
3
| function Welcome(props) {
return <h1>Hello, {props.name}</h1>;
}
|
类组件
1
2
3
4
5
| class Welcome extends React.Component {
render() {
return <h1>Hello, {this.props.name}</h1>;
}
}
|
组件状态
使用类组件
1
2
3
4
5
6
7
8
9
10
11
12
13
14
15
16
17
18
19
20
21
22
23
| import React from 'react';
export default class IndexPage extends React.Component {
constructor(props) {
super(props);
this.state = {
count: 0,
};
}
clickButton = () => {
this.setState({ count: this.state.count + 1 });
};
render() {
return (
<div style={{ marginLeft: 100, marginTop: 100 }}>
{this.state.count}
<button style={{ marginLeft: 50 }} onClick={this.clickButton}>click</button>
</div>
);
}
}
|
16.8之前函数式组件不支持State,16.8之后支持Hook来实现组件状态
不直接对state赋值,而是应该使用 setState();出于性能考虑,React 可能会把多个 setState() 调用合并成一个调用。
MVVM
Virtual DOM
组件通信
子组件使用父组件数据
正常的自上而下的数据流,通过组件的props
1
2
3
4
5
6
7
8
9
10
11
12
| const Child = ({ name }) => {
return <div>{name}</div>
}
class Parent extends React.Component {
render() {
return (
<Child name={"parent"} />
)
}
}
|
父组件使用子组件数据
表格查询等场景,父组件使用查询组件的查询条件来请求列表数据
1
2
3
4
5
6
7
8
9
10
11
12
13
14
| const Child = (props) => {
<div onClick={() => props.onClick('search')}>查询</div>
}
class Parent extends React.Component {
handleSearch = (data) => {
console.log("Parent received value from child: " + data)
}
render() {
return (
<Child onClick={this.handleSearch} />
)
}
}
|
兄弟组件数据传递
1
2
3
4
5
6
7
8
9
10
11
12
13
14
15
16
17
18
19
20
21
22
23
| const Child = (props) => {
<div onClick={() => props.onClick('search')}>查询</div>
}
const Table = (props) => {
<div>{props.data}</div>
}
class Parent extends React.Component {
constructor(props) {
super(props)
this.state = {list: 0}
}
handleSearch = (data) => {
this.setState({list: data})
}
render() {
return (
<Child onClick={this.handleSearch} />
<Table data={this.state.list} />
)
}
}
|
生命周期
1
2
3
4
5
6
7
8
9
10
11
12
13
14
15
16
17
18
19
20
21
22
23
24
25
26
27
28
29
30
31
32
33
34
35
36
37
38
39
40
41
42
43
44
45
46
| import React from 'react';
export default class IndexPage extends React.Component {
constructor(props) {
super(props);
this.state = {
count: 1,
};
}
clickButton = () => {
this.setState({ count: this.state.count + 1 });
};
render() {
return (
<div style={{ marginLeft: 100, marginTop: 100 }}>
{this.state.count}
<button style={{ marginLeft: 50 }} onClick={this.clickButton}>click</button>
</div>
);
}
static getDerivedStateFromProps(props, state) {
return state
}
componentDidCatch(error, info) {
}
componentDidMount() {
}
shouldComponentUpdate(nextProps, nextState) {
return true
}
getSnapshotBeforeUpdate(prevProps, prevState) {
}
componentDidUpdate() {
}
componentWillUnmount() {
}
}
|
16.8之前函数式组件不支持State,16.8之后支持Effect Hook来使用生命周期
AntD 外部组件库
ant.design
引入
1
2
3
4
5
6
7
8
9
10
11
12
13
14
15
16
17
18
19
20
21
22
23
24
25
26
27
28
29
30
31
32
33
34
35
36
| import { Card, Button } from 'antd';
import React from 'react';
export default class Antd extends React.Component {
constructor(props) {
super(props);
this.state = {count: 0}
}
add = () => {
this.setState({count: this.state.count + 1})
};
minus = () => {
this.setState({count: this.state.count - 1})
};
render() {
return (
<div style={{
padding: '30px',
background: '#ececec',
minHeight: '100vh'
}}>
<Card title="Card title" bordered={false} style={{ width: "70%" }}>
<p>点击次数:{this.state.count}</p>
<p><Button onClick={this.add}> 增加 </Button></p>
<p><Button type="primary" onClick={this.minus}>减少</Button></p>
</Card>
</div>
);
}
}
|
网络请求
request
axios
数据获取
1
2
3
4
5
6
7
8
9
10
11
12
13
14
15
16
17
18
19
20
21
22
23
24
25
26
27
28
29
30
31
32
33
34
35
36
37
38
39
40
41
42
43
44
45
46
47
48
49
50
51
52
53
54
| import { Card, Button, Table, message } from 'antd';
import React from 'react';
import axios from 'axios';
const columns = [
{
"title": "编号",
"dataIndex": "id",
"key": "id",
},
{
"title": "文字",
"dataIndex": "title",
"key": "title",
}
];
export default class Antd extends React.Component {
constructor(props) {
super(props);
this.state = {data: []}
}
getData = () => {
axios.get("/api/get").then(
res => {
this.setState({data: res.data.data.map(e => ({...e, key: e.id}))})
}
).catch(err => {
message.error(err)
})
};
componentDidMount() {
this.getData()
}
render() {
return (
<div style={{
padding: '30px',
background: '#ececec',
minHeight: '100vh'
}}>
<Card title="Card title" bordered={false} style={{ width: "70%" }}>
<Table dataSource={this.state.data}
columns={columns}
/>
</Card>
</div>
);
}
}
|
表单提交
1
2
3
4
5
6
7
8
9
10
11
12
13
14
15
16
17
18
19
20
21
22
23
24
25
26
27
28
29
30
31
32
33
34
35
36
37
38
39
40
41
42
43
44
45
46
47
48
49
50
51
52
53
54
55
56
57
58
59
60
61
62
63
64
65
66
67
68
69
70
71
72
73
74
75
76
77
78
79
80
81
82
83
84
85
86
87
88
89
90
91
92
93
94
95
96
97
98
99
100
101
102
103
104
105
106
107
108
109
110
111
112
113
114
115
116
117
| import {Card, Button, Table, message} from 'antd';
import {Form, Input, Select} from 'antd';
import React from 'react';
import axios from 'axios';
const columns = [
{
"title": "编号",
"dataIndex": "id",
},
{
"title": "文字",
"dataIndex": "title",
}
];
const { Option } = Select;
const layout = {
labelCol: { span: 8 },
wrapperCol: { span: 16 },
};
const tailLayout = {
wrapperCol: { offset: 8, span: 16 },
};
export default class Antd extends React.Component {
formRef = React.createRef()
onFinish = (values) => {
console.log(values);
axios.post("/api/upload", values).then(
res => {}
).catch(err => {
message.error(err.error)
})
};
onReset = () => {
this.formRef.current.resetFields();
};
constructor(props) {
super(props);
this.state = {data: []}
}
getData = () => {
axios.get("/api/get").then(
res => {
this.setState({data: res.data.data.map(e => ({...e, key: e.id}))})
}
).catch(err => {
message.error(err.error)
})
};
componentDidMount() {
this.getData()
}
render() {
return (
<div style={{
padding: '30px',
background: '#ececec',
minHeight: '100vh'
}}>
<Card title="Card title" bordered={false} style={{width: "70%"}}>
<Table dataSource={this.state.data}
columns={columns}
/>
<Form {...layout} ref={this.formRef} name="control-ref" onFinish={this.onFinish} style={{"marginTop": "20px"}}>
<Form.Item name="note" label="Note" rules={[{required: true}]}>
<Input/>
</Form.Item>
<Form.Item name="gender" label="Gender" rules={[{required: true}]}>
<Select
placeholder="Select a option and change input text above"
allowClear
>
<Option value="male">male</Option>
<Option value="female">female</Option>
<Option value="other">other</Option>
</Select>
</Form.Item>
<Form.Item
noStyle
>
{({getFieldValue}) =>
getFieldValue('gender') === 'other' ? (
<Form.Item
name="customizeGender"
label="Customize Gender"
rules={[{required: true}]}
>
<Input/>
</Form.Item>
) : null
}
</Form.Item>
<Form.Item {...tailLayout}>
<Button type="primary" htmlType="submit">
Submit
</Button>
<Button htmlType="button" onClick={this.onReset}>
Reset
</Button>
</Form.Item>
</Form>
</Card>
</div>
);
}
}
|
通过React Developer Tools 可以在网页查看实时组件信息
微前端
技术栈无关
主框架不限制接入应用的技术栈,微应用具备完全自主权
独立开发、独立部署
微应用仓库独立,前后端可独立开发,部署完成后主框架自动完成同步更新
增量升级
在面对各种复杂场景时,我们通常很难对一个已经存在的系统做全量的技术栈升级或重构,而微前端是一种非常好的实施渐进式重构的手段和策略
独立运行时
每个微应用之间状态隔离,运行时状态不共享
qiankun微前端框架

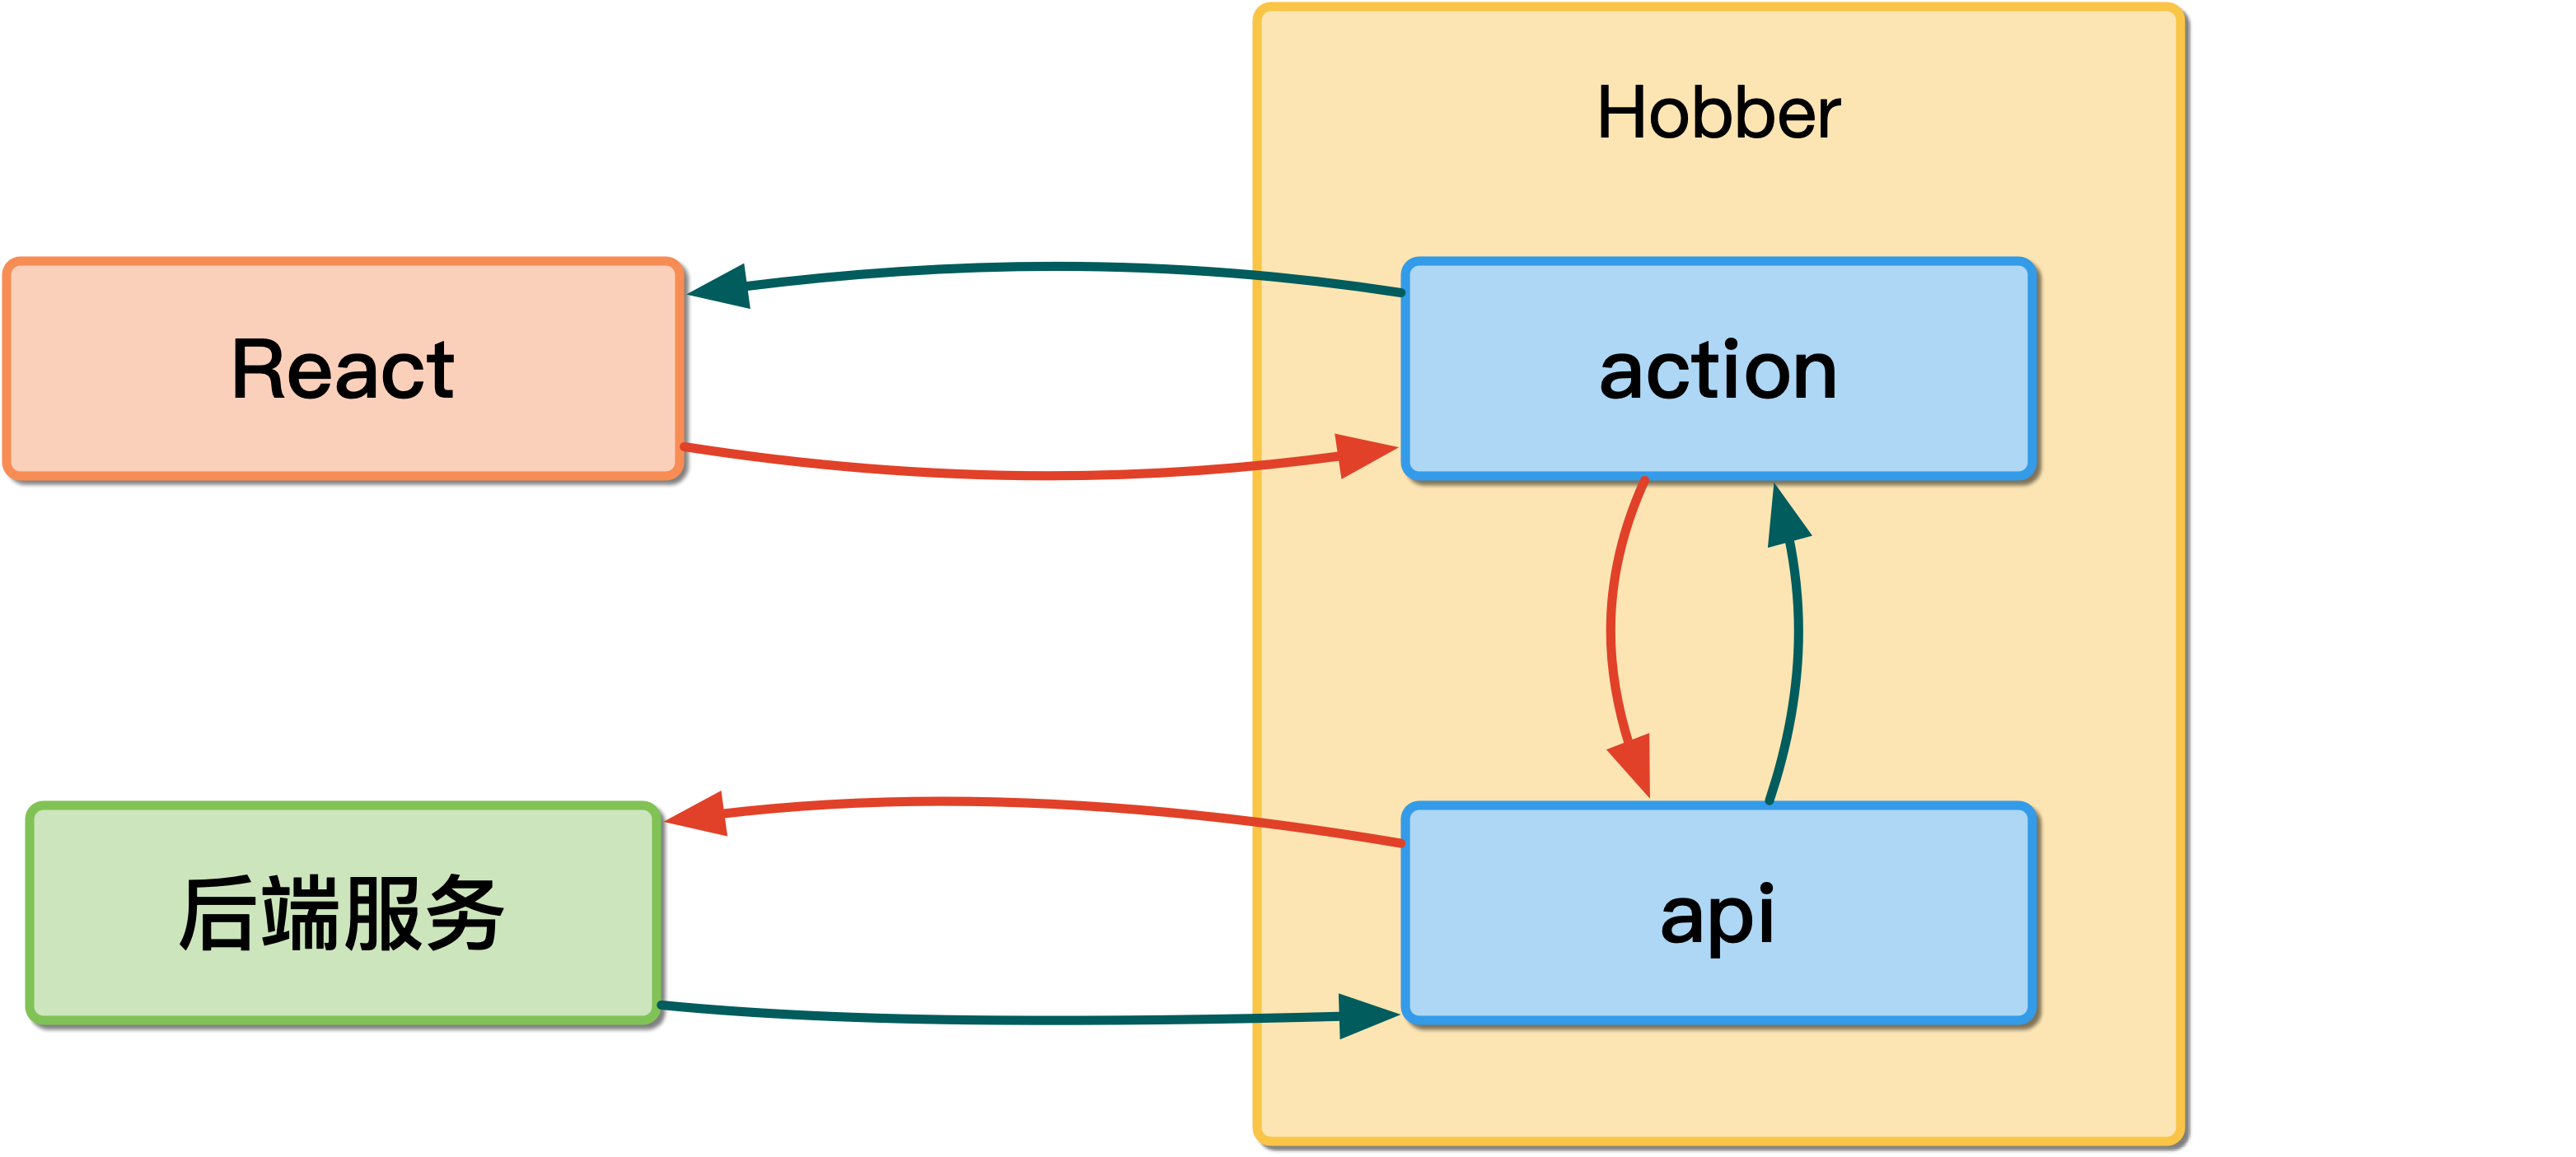
Hobber
公司的基于 koa2,采用 typescript 开发的 node 框架
进一步阅读
参考